

How To Clean A Toilet Float Valve
Easy Fixes for Common Toilet Tank Parts
Learn how to fix broken parts of your toilet such as flappers, fill valves, affluent valves and handles.
![]() Time
Time
An hour or less
![]() Complexity
Complexity
Beginner
![]() Cost
Cost
Less than $20
Introduction
Toilets have moving parts, and moving parts wear out or break. If your toilet won't stop running, attempt repairing or replacing these key toilet parts. We cut away the fronts and backs of new toilets to testify you lot how to supervene upon these toilet tank parts. Your toilet and toilet tank parts won't look and then pristine inside. You lot'll discover scummy surfaces, h2o stains and corrosion. But don't be squeamish — the h2o is as clean as the stuff that comes out of your faucets.
Tools Required
Materials Required
- Fill valve
- Flapper
- Toilet handle and retaining nut
- Valve washer
Finding the Problem is Usually Unproblematic
A toilet runs constantly considering the fill valve that lets water into the toilet tank isn't endmost completely. A toilet runs intermittently because the flapper valve opens slightly for a few minutes. In either case, you lot take to effigy out why that toilet fill valve isn't stopping the incoming water flow and if at that place are cleaved toilet parts that need attention.
To ready toilet problems, you first need to know how a toilet works. Watch this video to learn but that.
Projection step-by-step (xix)
Step 1
Look for Leaks
- If you find leaks coming from the tank bolts or toilet flush valve, you'll near likely demand to remove the toilet tank from the bowl so you can supplant the tank bolts, the prophylactic washers and the gaskets on the flush valve.
- If there are leaks around the fill valve, tighten the locknut.
- Leaks can come from cracks in the tank, besides. In that instance, the merely reliable solution is a new toilet.
Pace ii
If You Don't Detect Leaks, Elevator Off the Tank Cover
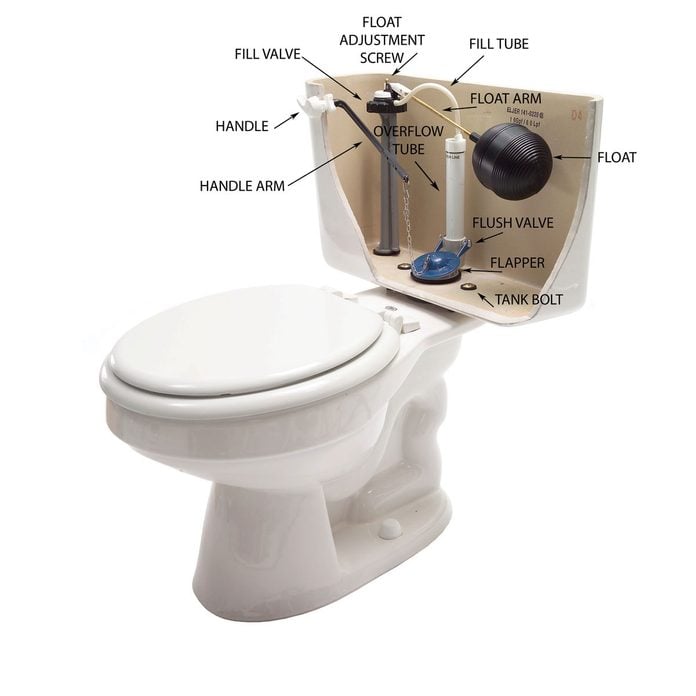
There are actually only two main toilet tank parts: The toilet flush valve, which lets water gush into the bowl during the flush, and the fill valve, which lets water refill the tank after the flush. When a toilet runs constantly or intermittently, one of these valves is usually at error.
- Look at the overflow tube to determine which toilet valve is causing the trouble.
- If h2o is alluvion into the tube, in that location's a problem with the toilet fill up valve.
- If the water level is below the meridian of the tube, the flush valve is leaking, letting water trickle into the bowl. That slow, constant outflow of water prevents the fill up valve from endmost completely.
![]()
Step three
Suit the Float
If your flapper valve has a brawl that floats at the stop of a rod, gently lift the rod and listen. If the water shuts off, you may exist able to stop the running by adjusting the float.
- Gently bend the float arm down to put extra pressure level on the toilet valve.
- To adjust a float that doesn't accept an arm, see Step 14 "Conform the Bladder" below
- Flush the toilet to encounter if it works.
- Some fill up toilet valves take a float adjustment screw on pinnacle (see beneath). If at that place is no aligning spiral, bend the float arm. If y'all have a Fluidmaster-fashion fill valve, make sure it's adapted properly (Photograph 8). You don't have to empty the tank to make these adjustments.

Step 4
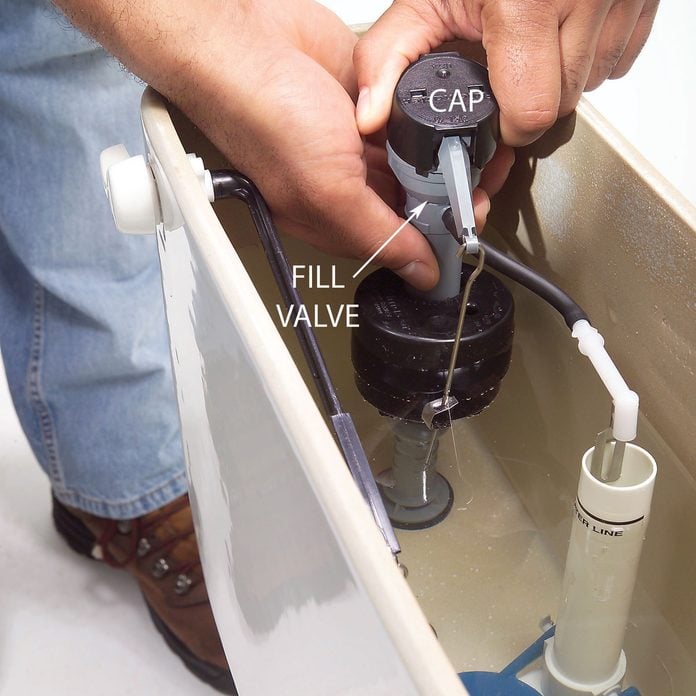
Take Off the Fill Valve Cap
- Remove the fill valve cap.
- On this type of toilet valve, press down and turn counterclockwise. Remove screws on other types of valves.
Step five
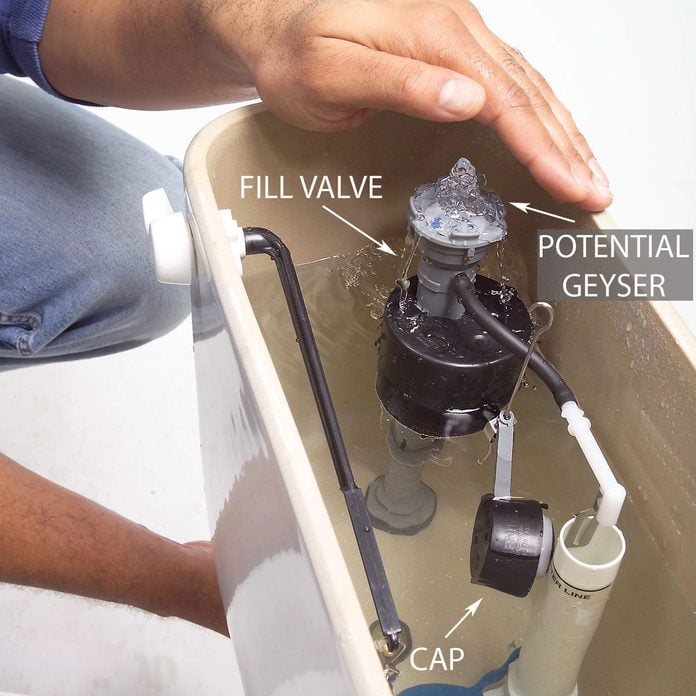
Flush the Valve with Water
- Cover the flapper valve with your hand.
- Plough on the h2o (charily, then you don't go sprayed!) and let it flush out the toilet valve for a few seconds.
Step half dozen
Replace the Washer
- Audit the washer for wear or cracks when you remove the cap to flush out the valve.
- Replace a worn, cracked valve washer by prying the one-time washer out of the cap with a small screwdriver.
- Press the new one into place.
- Replacing a bad washer is cheap and like shooting fish in a barrel. But finding the right washer may non be. The most common washers are oftentimes available at home centers and hardware stores.
- Pro tip: Professional plumbers ordinarily supplant the whole fill valve rather than hunt for a replacement washer.
- Replacing a bad washer is cheap and like shooting fish in a barrel. But finding the right washer may non be. The most common washers are oftentimes available at home centers and hardware stores.

If these fill valve repairs don't work, replace it.
Footstep 7
To Supplant the Fill Valve, First by Removing the Water from the Tank
- Turn off the water at the shutoff valve.
- Flush the toilet and hold the flush valve open to drain the tank.
- Sponge out the remaining water or vacuum information technology up with a wet/dry vacuum.
- If y'all don't have a shutoff, turn off the h2o supply at the main shutoff valve, where h2o enters your home. This is a good time to add a shutoff valve next to the toilet or replace ane that leaks. This is also a skilful time to replace the supply line that feeds your toilet.

Step 8
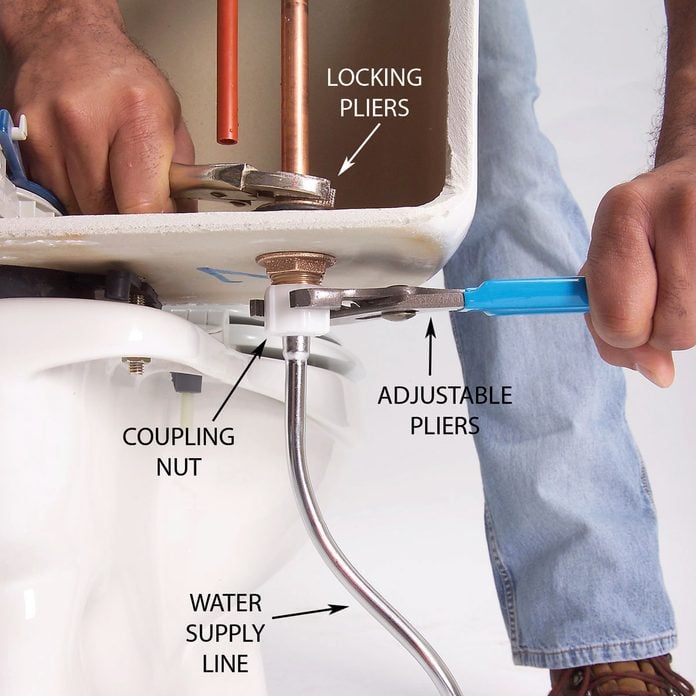
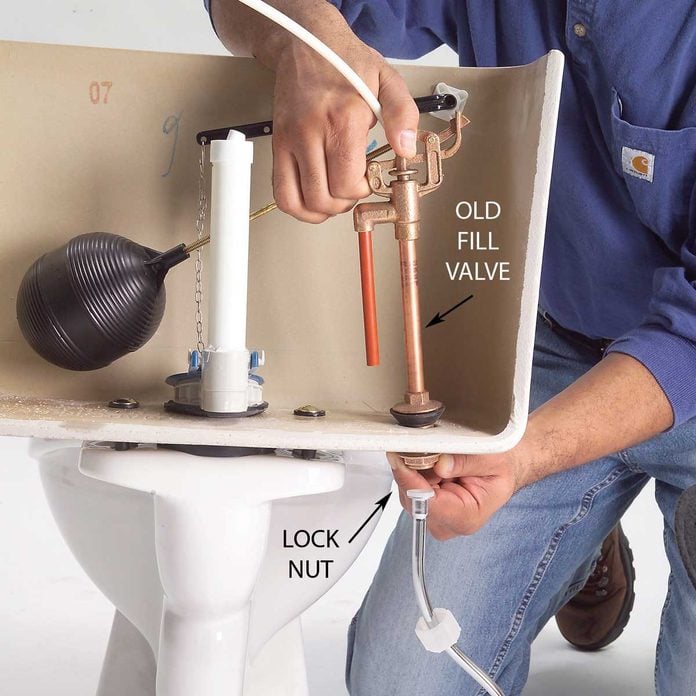
Remove the Coupling Nut
- Unscrew the coupling nut that connects the supply line.
- If the toilet valve turns inside the toilet tank, agree its base with a locking pliers.
- Pro tip: Throw a towel on the floor underneath to catch h2o that will drain from the line.
Step 9
Remove the Old Flapper Valve
- Remove the locknut that holds the toilet valve to the tank.
- Push downwardly gently on the valve as you unscrew the nut.
- Pull out the old valve.
Step 10
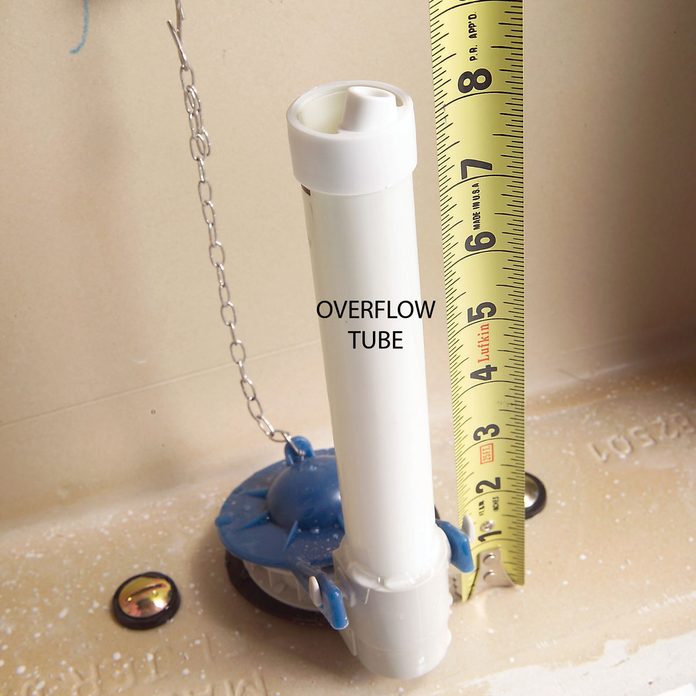
Measure the Overflow Tube
- Measure out the height of the overflow tube.
- Measure out to the top of the tube, not to any water level label on the tube.
Step 11
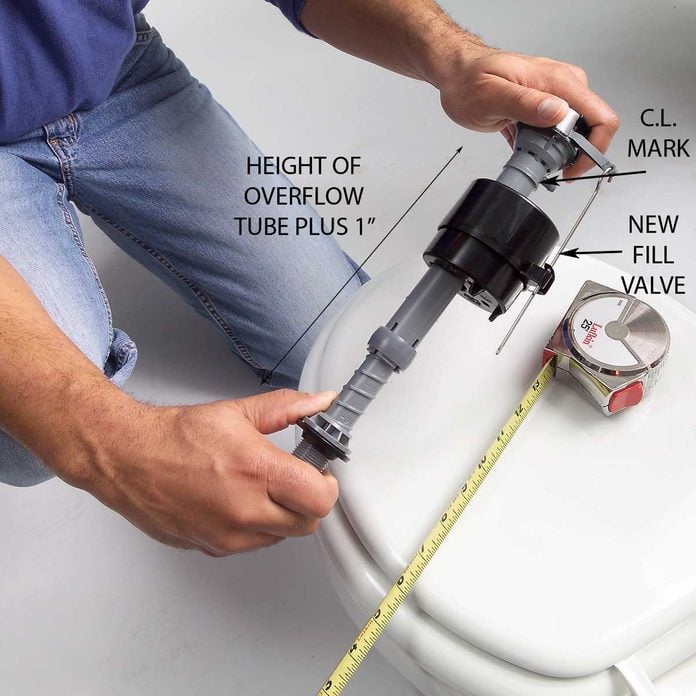
Twist the Superlative of the New Valve to Conform the Superlative
- Adjust the height of the new fill up valve by property the base and twisting the acme.
- The acme from the base of operations to the CL (disquisitional level) marking should be the peak of the overflow tube plus one inch.
Footstep 12
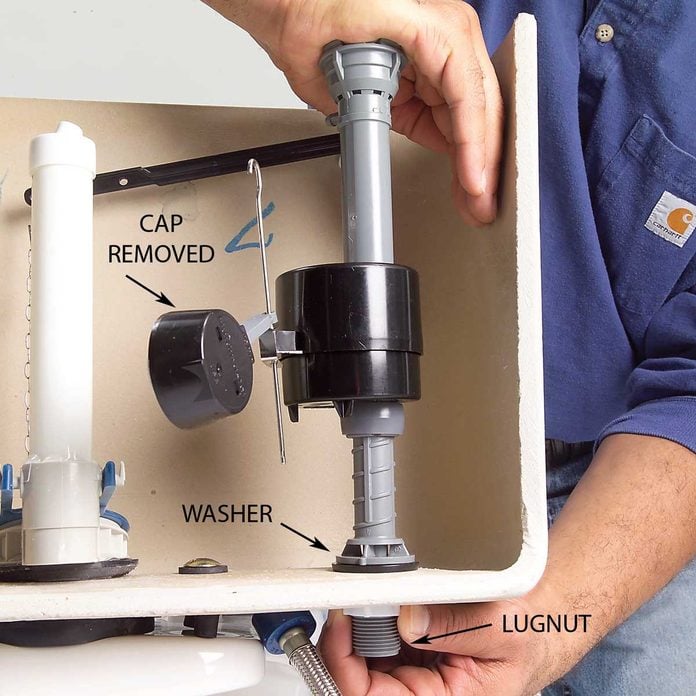
Install the New Fill Valve
- Remove the cap, press down to compress the washer and screw on the locknut.
- Connect the supply line and flush the valve.
- Reset the cap and check for leaks.
Step 13
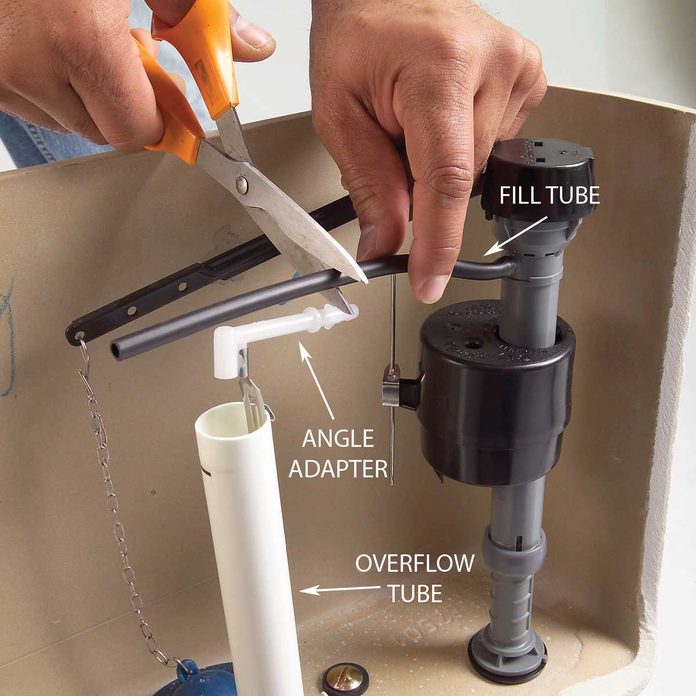
Cut the Fill Tube to Fit the Angle Adapter
- Sideslip the fill up tube onto the fill valve.
- Clip the angle adapter onto the overflow tube.
- Then cut the tube to fit and slip information technology onto the angle adapter.
Pace 14
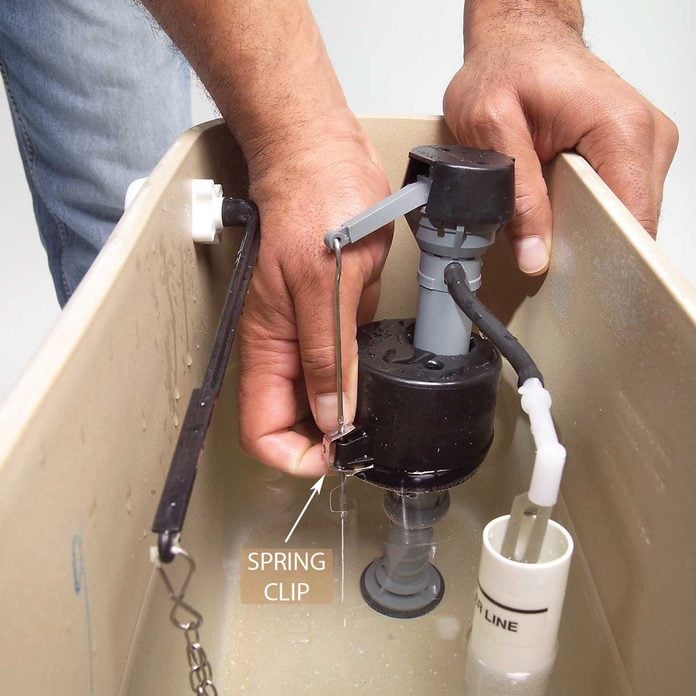
Arrange the Bladder
- Turn on the water to make full the toilet tank.
- Pinch the spring clip and slide the float up or down to set the water level one inch beneath the top of the overflow tube or to the h2o line marked on the tank.
- When y'all turn the water supply back on, immediately check for leaks and tighten the nuts more if necessary.
Footstep 15
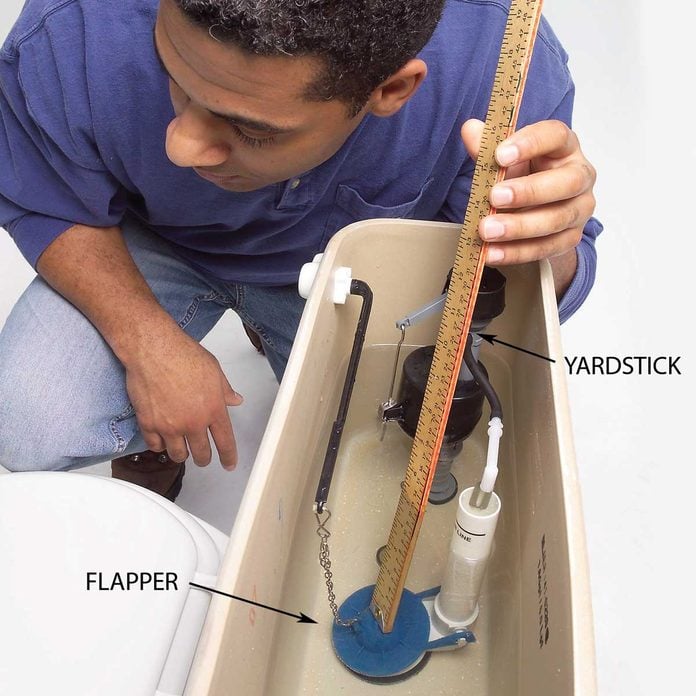
To Set the Flush Valve, Start past Listening for Running Water
- Push down on the flapper with a yardstick and listen.
- If the audio of running water stops, the flapper needs replacing.
- If extra pressure level on the flapper doesn't stop the running noise, water is likely escaping through a croaky or corroded overflow tube. In that case, y'all have to detach the tank from the bowl and supervene upon the whole flush valve.
- Since the overflow tube is rarely the crusade of a running toilet, we won't cover that repair here.
- If extra pressure level on the flapper doesn't stop the running noise, water is likely escaping through a croaky or corroded overflow tube. In that case, y'all have to detach the tank from the bowl and supervene upon the whole flush valve.
Stride 16
Clean the Flapper
- Turn off the water.
- Flush the toilet to empty the tank and then run your finger around the rim of the affluent valve seat.
- If you feel mineral deposits, make clean the affluent valve seat with an abrasive sponge or Scotch-Brite pad.
- Don't utilize annihilation that might roughen it.
- If cleaning the flush valve seat doesn't solve the trouble, you need to supplant the flapper.
Stride 17
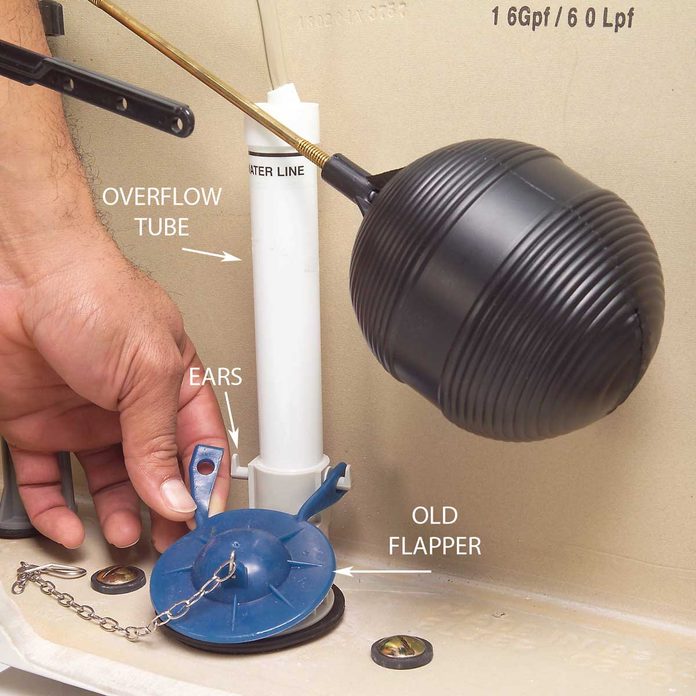
Remove the Flapper
- Remove the erstwhile flapper from the ears of the overflow tube and detach the chain from the handle arm.
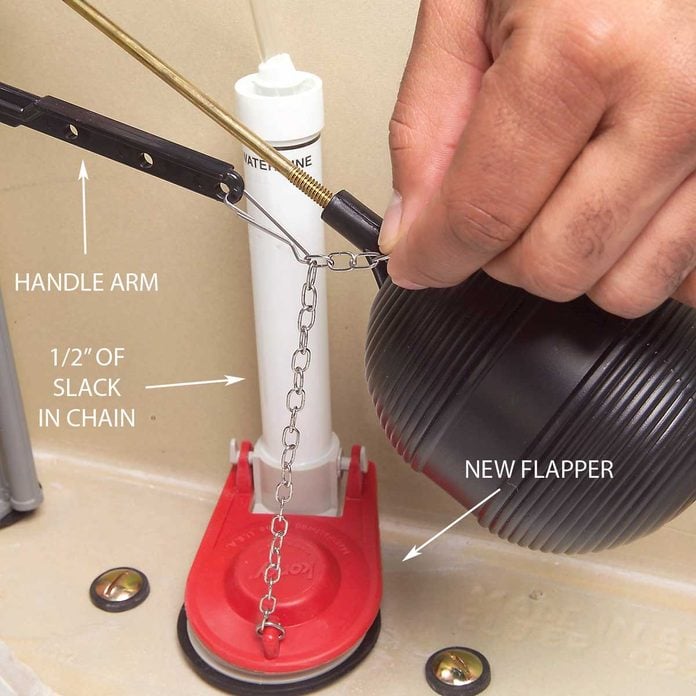
Step 18
Install the New Flapper
- Attach the new flapper to the overflow tube and hook the chain to the handle arm.
- Leave 1/2-in. of slack in the chain.
- If at that place's too much slack in the concatenation, it can tangle upwards and prevent the flapper from closing firmly. A chain with besides niggling slack tin can cause trouble besides.
- Plow the h2o back on and test flush the toilet.
- Replacing your flapper may require slightly different steps than nosotros bear witness. Your flapper may screw onto a threaded rod or take a ring that slips over the overflow tube.
- If you lot have an unusual flush valve, finding a replacement flapper may be the hardest office of the job.
- Replacing your flapper may require slightly different steps than nosotros bear witness. Your flapper may screw onto a threaded rod or take a ring that slips over the overflow tube.
Step xix
Replace a Broken or Corroded Toilet Flush Handle
- Toilet flush handles are another part of a toilet that can cause toilets to keep running.
- Often handles are toilet parts that become loose or corroded and no longer pull the flap up or drop it dorsum down properly.
- Information technology's an easy repair, merely at that place's a play tricks to getting the flush handle out.
- Often handles are toilet parts that become loose or corroded and no longer pull the flap up or drop it dorsum down properly.
- The retaining nut inside the tank is a opposite thread. So if yous're in front end of the toilet, turn the nut to the left to loosen.
- Then remove the old handle and lever, slide the new handle into place, and thread on the retaining nut.
- Tighten by turning to the right.
Originally Published: November 28, 2019

Source: https://www.familyhandyman.com/project/parts-of-a-toilet/
Posted by: duartedenjudd67.blogspot.com
0 Response to "How To Clean A Toilet Float Valve"
Post a Comment